Getting Started
First download the Ubiqua installer to your computer. Create an account at: https://www.ubilogix.com/register, the registration is free and it will take you no more than a couple of minutes. Please remember to read the End User License Agreement before using Ubiqua and its related services. If you already have an account, then you can just sign in, after this you will be directed to your Dashboard where you will be able to download Ubiqua from the Licenses tab, click on the Downloads button and select the installer.
Requirements
Ubiqua requires the following resources to work properly on your system. Make sure your system meets the minimum requirements before you install it.
- Windows 8.1 or later.
- Microsoft .NET Framework 4.7.2 or later.
- Microsoft VS C++ Redistributable 14 or later (available for x86 here).
- Internet access.
Installation
After downloading the Ubiqua Installer, navigate to the location where it was saved and double-click on it. The installation process will begin with the Setup Wizard window.
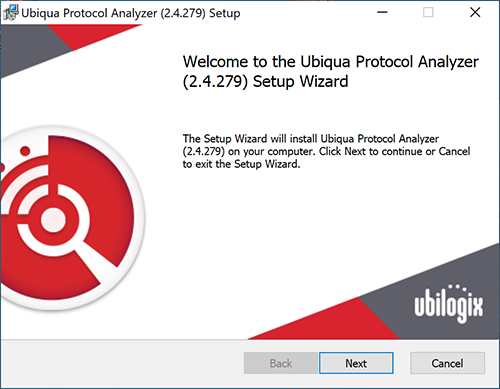
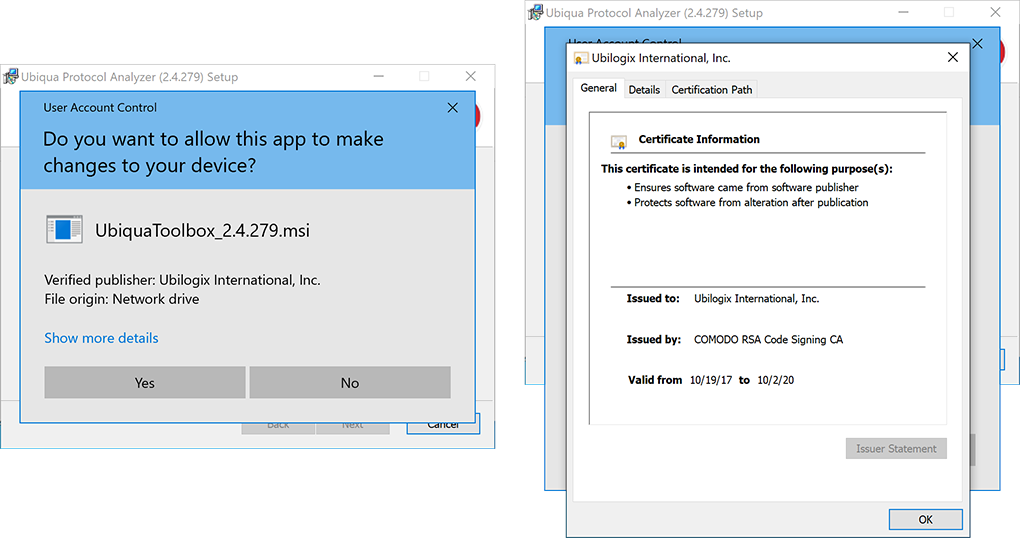
Click on the Next button and then read the End-User License Agreement. You need to agree to the License Agreement by clicking the I accept the terms in the License Agreement check box in order to continue with the installation. Following this action a User Control Dialog will appear asking you to accept the changes on your device, in this window you will find details about the Ubilogix certificate, click on the Show more details link to expand the information about this.
Next you have to choose a location on your hard disk drive where Ubiqua will be installed. By default it will create a folder named Ubilogix and a subfolder Ubiqua Protocol Analyzer within the Program Files folder and place all needed files for the software to operate in there. We recommend you don’t change the default destination folder unless you have a better option that suits your needs. To continue installing Ubiqua, click on the Next button.
Now the wizard is ready to copy all the files. Click on the Install button. Depending on your user credentials the installer might ask you for permission to make changes, in such case please follow the instructions on the screen. The installation process should not take more than a few seconds. On the final screen you will be informed that the installation process is completed, click the Finish button to close the setup wizard window.
Congratulations, you now have Ubiqua installed on your system!
Starting a 21 days evaluation
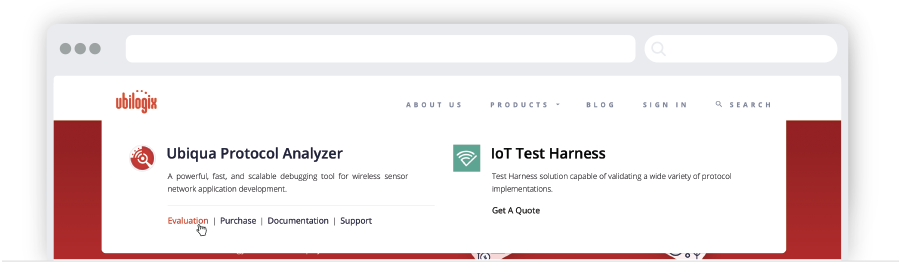
To activate your free 21 days evaluation you need an Ubilogix account; if you don’t have it already, go to the Ubilogix website and from the top menu go to the Products > Ubiqua option, select the Evaluation link and follow the instructions, if you decide to buy a license select the Purchase link, then click the Create a subscription button and configure your subscription plan, for more details about our licensing methods you can read about it our FAQ Section.
You should get your evaluation access code by email within a few minutes. To be able to use the evaluation you have to redeem the access code; for this just follow the instructions in Redeem Activation Code section. Please note that only one evaluation-license is provided per user account. The evaluation version of Ubiqua is the fully functional version, but with a 1000 packets limit when capturing, or opening capture files. Once the evaluation period ends, the Welcome window will only show the options to upgrade or purchase a license.
Redeem Activation Code
To activate your copy of Ubiqua, you need a valid Activation Code and a working Internet connection. The Activation Code is sent to you by e-mail after a successful Ubiqua purchase. If you have purchased Ubiqua but you haven’t received your Activation Code, please check first the spam folder of your mailbox; then, if needed, write to us at: support@ubilogix.com
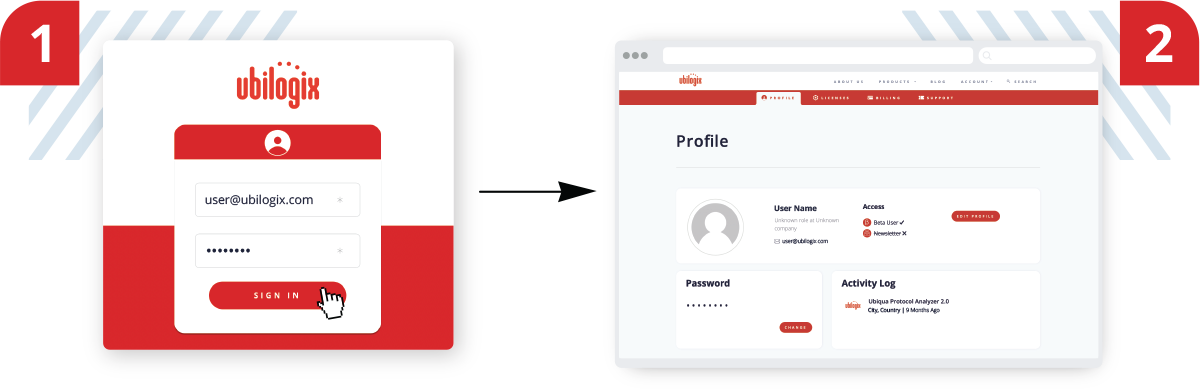
To proceed with the activation process, login to your Ubilogix account pointing your web browser to www.ubilogix.com/login and type your access credentials (email and password)
Click the Sign in button, by default you will be presented with your profile page.
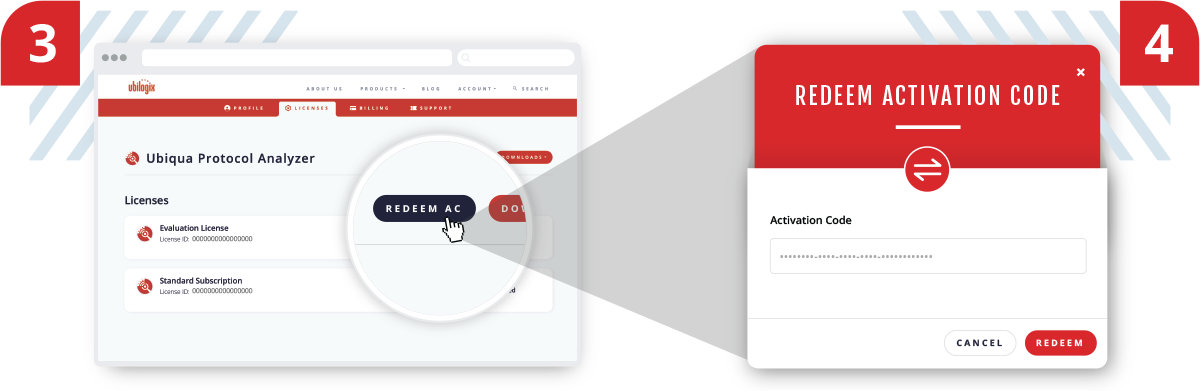
From the Dashboard sub menu click the Licenses tab and then the Redeem AC button. A dialog will appear where you can type or paste your activation code, following this action click the Redeem button. Note that you can find the Activation Code of your subscription by going to Billing > Subscriptions > Details, after this a dialog will show, click the Activation Codes expander and copy your code. When you purchase an Ubiqua subscription this code is also sent to your e-mail.
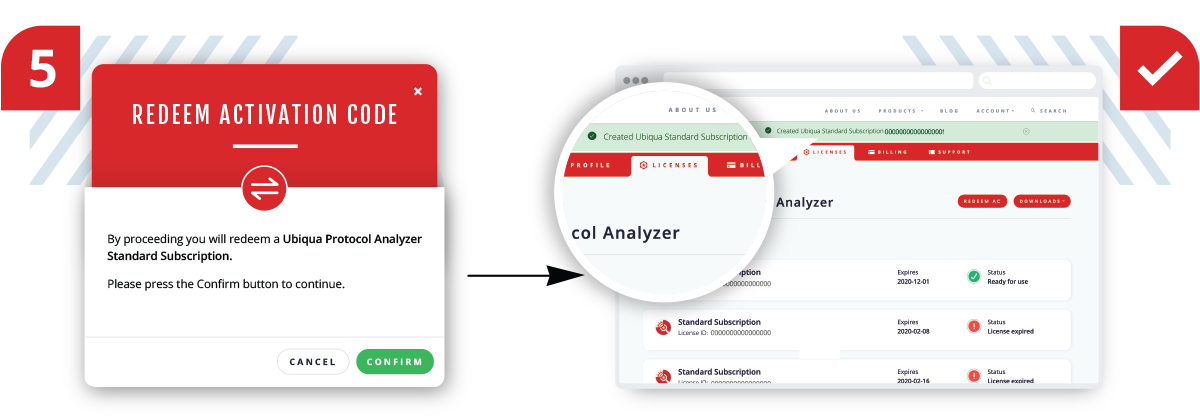
Finally click the Confirm button, if the process succeeds your new Ubiqua License will be displayed, and a success message will be shown.
Starting Ubiqua
To start Ubiqua either double-click on the Ubiqua Protocol Analyzer shortcut icon on your desktop or type Ubiqua Protocol Analyzer in the Windows search bar. A Splash screen featuring the Ubiqua logo will appear.

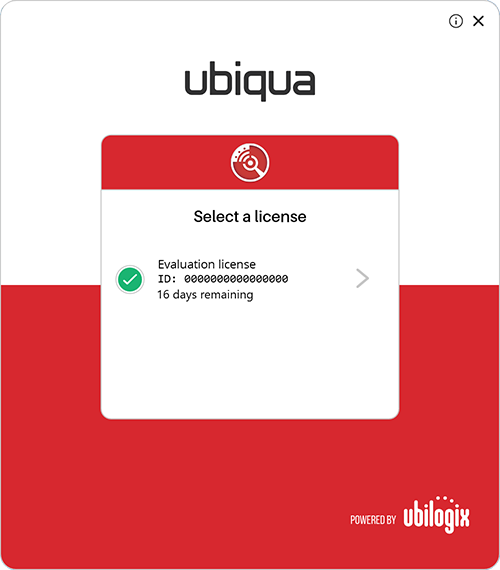
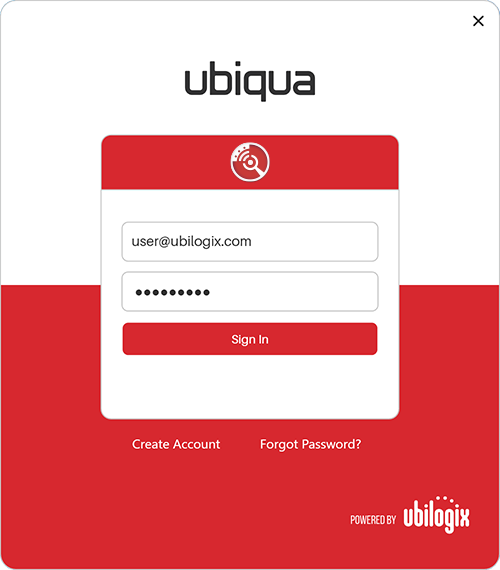
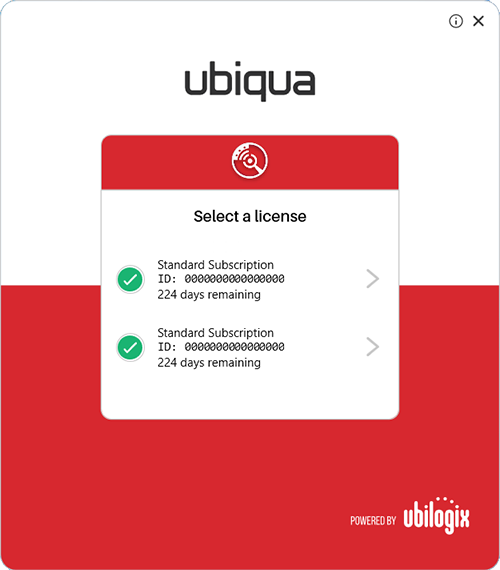
The first time you run Ubiqua the Ubiqua Authentication window and the Welcome window will appear. The Ubiqua Authentication window will ask for your Ubilogix account, write the email and password of your Ubilogix account in the respective E-mail and Password text boxes. If you have an Ubilogix account but you can’t remember your password, start the recovering password process by clicking Forgot Password or at the recover page.
From here you can select the available licenses.
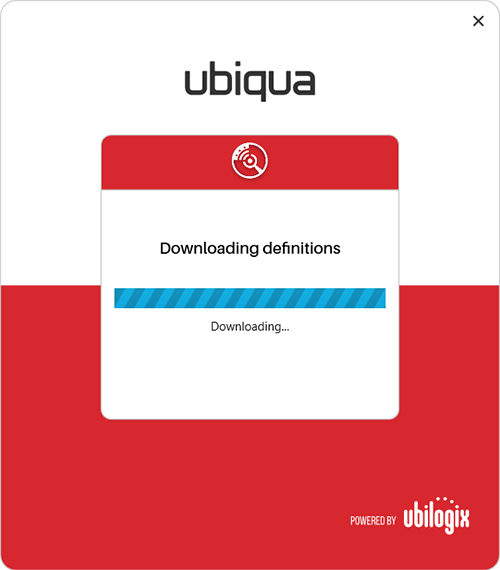
If it is the first time you run Ubiqua it may need to connect to the Internet to download additional updated components; this process may take a few moments and then Ubiqua will be ready to run.
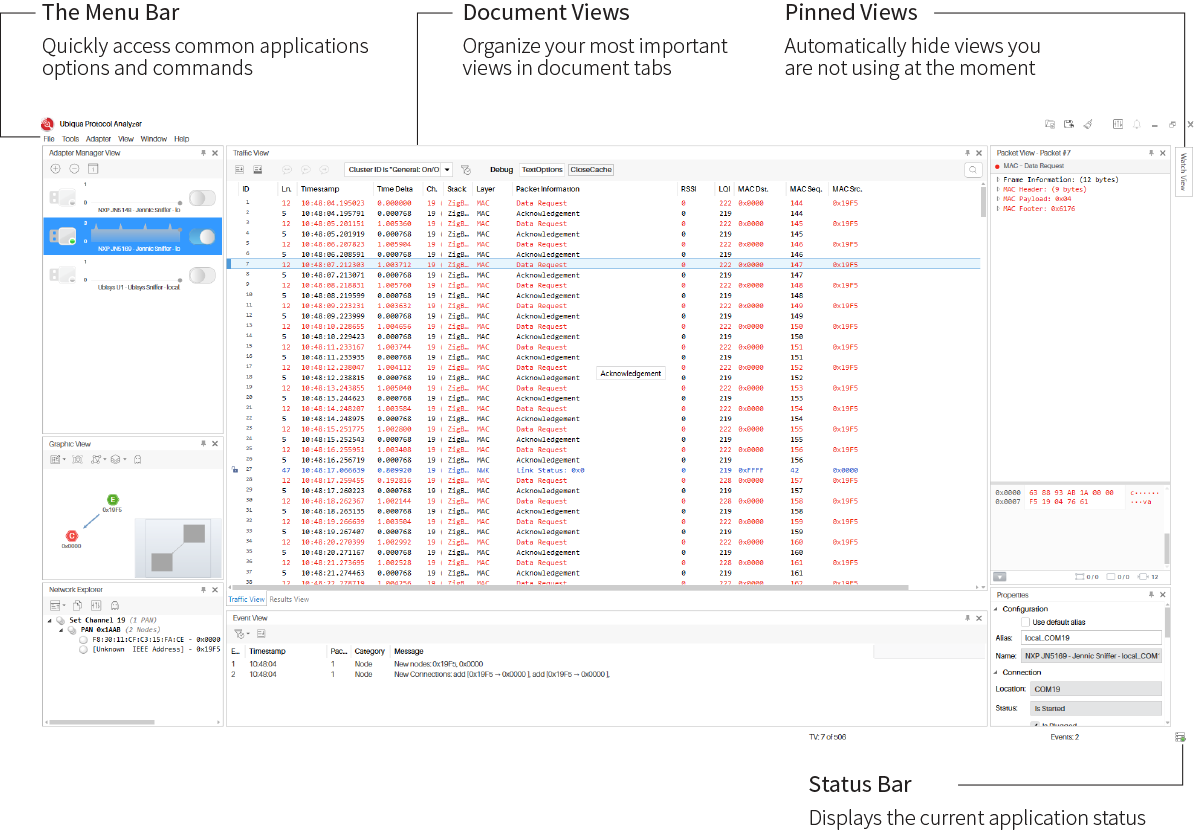
The User Interface
The Ubiqua user interface is organized in dockable panels. Each panel provides access to different sets of information and tools of the Ubiqua software. This section introduces you to this environment and will guide you through each of the visual components in the application. Further sections of this user guide discuss each component in more detail.
The main window of Ubiqua is composed of 3 sections: the menu bar, the workspace, and the status bar. The menu bar, as in other applications, offers you access to the most common options and commands available in the application. The status bar displays the current application status or shows information about the current selected packet. The most complex section is the workspace. As explained above, the many views of Ubiqua are actually dockable panels you can arrange to form the layout of your preference.
Docking Panels
Each panel has 4 dock modes: floating, dockable, auto hide, and hide. The layout of the workspace is changed by dragging and dropping the individual panels.
For instance, while dragging the panel over the workspace, icons will appear over the existing panels giving you the option to put the dragged panel on top, on the right, on the bottom, on the left, or as a tab of the target panel. If you drag the panel out the main window, the mode will change to floating. To auto hide a panel in dockable mode, just click the button with the pin icon on the top right area of the panel (to the left of the close button).
Auto hidden panels will show up when the mouse cursor is over the panel tab (which is located at the far left side of the main window), and will automatically hide when you move the mouse out of the panel. In the above figure, the Watch View is in auto hide mode. To change the mode of an auto hidden panel, you must click the button with the pin icon again (it will show a rotated pin icon).
Once you have set the layout to your convenience, Ubiqua will keep the views arranged in the way you specified. You can always reset the layout to the default by using the Window > Reset Window Layout menu item. You have also the option to save the layout on a file and recover it later, to do so use the File > Save Environment… and File > Load Environment… menu items. The environment file does not only contain the layout but all application settings (for details see Setting Preferences).
The Menu Bar
The menu bar offers access to the most common actions in Ubiqua. The following is a brief description of what each menu item does and where you can find more information.
File
-
Open Capture – Opens a capture file and loads all the stored data which includes raw packets, security keys, addresses, graph layouts, and others (details in Capture Files).
-
Open Recent Capture – Allows you to access the recently opened capture files; the list is limited to the last 32 files. Unexisting files will be dimmed and the (not found) text added at the end. To reset the list click the Clear menu item at the end of this submenu.
-
Open Partial Capture – Obtains a consecutive selection of packets of a CUBX capture file. To open partial capture, click on the Open Partial Capture option of the File menu. Select the capture file to open and click the Open button. The Select Capture Packets dialog opens and the user can select a packets range. The date and time are visible when the user hovers over the slider of the selected packet.
-
Save Capture As – Saves a new capture file with all the present data in the application.
-
Save Filtered Capture As – Saves a new capture file containing all the present data in the application but only the packets available through the currently enabled filter (details in Filtering Packets).
-
Export Packets – Exports only the packets in the capture; excluding the Security Keys and collected Network Addresses (details in Exporting Packets).
-
Open Environment – Opens an environment file and loads all application settings such as views layouts, Traffic View column customizations, and others (details in Setting Preferences).
-
Save Environment – Saves a new environment file and stores all application settings.
-
Exit – Closes the application.
Tools
-
Change Protocol Stack… – This menu item allows you to change the protocol stack of captured packets by channel and PAN ID combinations (details in Changing Protocol Stacks).
-
Go To Packet… – Selects the packet with the specified ID in the Traffic View (details in Go To Packet).
-
Find – Makes a string search of the information contained in the Traffic View (details in Find Packets).
-
Merge Captures – Allows the user to merge .cubx files, bringing together into one file all the packets from multiple source files (details in Merge Captures Files).
-
Recovered Captures – Allows the user to recover retrieved captures when Ubiqua is not closed correctly (details in Capture Files Recovery).
-
Preferences – Shows the options dialog where the application settings are set (see Setting Preferences).
Adapter
-
Connect/Disconnect - Once your adapter is added to the Adapter Manager View list, use this option to initiate/terminate the logical connection with the adapter. This connection gives Ubiqua control over the adapter and avoids any other application to communicate with it. When you have several instances of Ubiqua open, then you need to manually connect the adapter to the instance where you want to use it.
-
Start/Stop – Starts/Stops the sniffer application of the selected adapter on the Adapter Manager View when it is already connected.
-
Config Radio - Allows you to configure the frequency of the adapter’s radio.
-
Protocol Stack – Allows you to set the protocol stack used to decode incoming packets from the selected adapter on the Adapter Manager (see Configuring Adapters for details).
-
Set Channel – Allows you to set the channel of the selected adapter on the Adapter Manager.
-
Scan Channels - Opens the Scan Channels window to setup the adapter to scan the selected channels for a determined amount of seconds.
-
Add – Opens the dialog used to add a new adapter to the manager (see Adding Adapters).
-
Remove – Removes the currently selected adapter on the Adapter Manager (see Removing Adapters).
-
Remove All – Removes all the adapters listed on the Adapter Manager (see Removing Adapters).
View
-
Traffic View – Shows a view containing a grid with the available packets (see Traffic View).
-
Packet View – Shows a view containing the details of the currently selected packet (see Packet View).
-
Graphic View – Shows a view containing a graphical representation of the network. See Graphic View for more details about the functionality of this view.
-
Network Explorer – Shows a view containing a tree of the identified network nodes (see Network Explorer).
-
Adapter Manager – Shows a view containing a list of adapters (see Adapter Manager).
-
Properties – Shows a view containing the details and options for the selected item. (see Configuring Adapters and Customizing Nodes for more details).
-
Watch View – Shows a view containing the current values of selected fields and variables (see Watch View for more details about the functionality of this view).
-
Event View – Highlights notable traffic events in a dedicated listing (details in Event View).
-
Output View – Displays the status messages generated for every petition response made to the Ubiqua Remote Services (details in Output View).
-
Results View – Displays the result of a filter or a string search applied to a live or saved Traffic View’s capture (details in Results View).
Window
-
Reset Window Layout – Resets the workspace layout to its default as explained in Docking Panels.
-
Minimize To Tray – Hides the Ubiqua window leaving only an icon in the system taskbar where you can show the window again. This option is useful for capturing packets in background mode or to control Ubiqua by the means of the services it provides (see Ubiqua Services for details).
Help
-
Documentation – Allows you to open documentation website such as this guide.
-
Ubiqua Support Page – Opens the Ubilogix support webpage.
-
Check for Updates… – Checks if a new version of Ubiqua is available for download and opens a dialog showing the latest release notes and if you are eligible for the update according to your license status (see Check for Updates).
-
About Ubiqua – Opens the application about window.
Exiting Ubiqua
When you have a Standard Subscription, Ubiqua will present a dialog with the options available before closing the application.
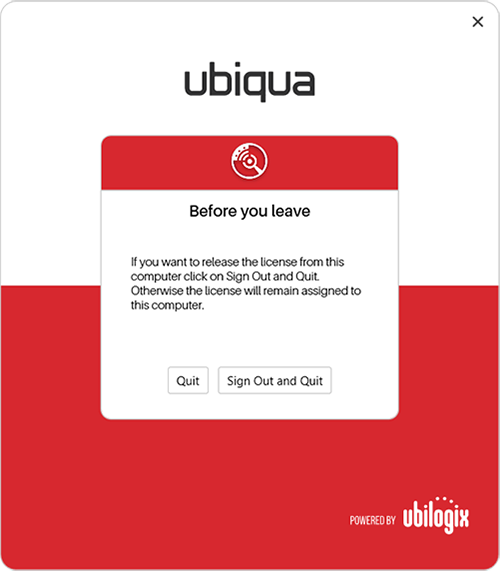
- Quit: this option will close Ubiqua leaving your user authenticated so you don’t have to sign in next time you start the application.
- Sign out and quit: this option will release your license from the current system and let you login to another computer with the same license.