Packet View
The Packet View displays the decoded packet data along with its raw contents. The view is composed of two panels, a Status Bar and an optional Description Panel for when the packet contents are still encrypted. (see figure below). At the top of the Packet View, the Title bar shows details such as the security keys and network addresses used to decrypt the packet. Below the Title bar, the First panel contains a tree; the tree is a hierarchical representation of all the decoded fields of the packet currently selected on the Traffic View. Finally, the second panel is the Bytes panel; this panel displays the hexadecimal and ASCII representations for each byte of the packet.
The panels are linked together so if you select a tree node, the corresponding bytes for the field will be highlighted on the Bytes panel and the other way around. Finally, the status bar of the view indicates the offset and length values relative to the full packet, to the selected fields of the tree node, or to the selected panel cells.
In the Title bar there’s a lock icon (see the figure below), when clicked it shows the optional panel that shows the key for decrypting the packed data or if not accessible allows the user to type in the decryption key.

Each panel in the Packet View has its own context menu. Through the tree context menu you can copy (Ctrl+C) the selected field in the default format or in additional formats by using the Copy As options, also, you can create or edit filters (see Creating Quick Filters). The context menu in the Bytes panel allows copying the selected bytes and also you can navigate to the parent field of the selection by pressing the Esc key.
You are not restricted to only one Packet View instance at a time, you can open as many as you need. Just double click on a packet in the Traffic View to launch its Packet View.
Testing Decryption
The Title bar will always display the row color in the form of a colored circle on the top left and the packet information as it is displayed in the Traffic View (see Traffic View for more information. Whenever a packet is encrypted, regardless of whether they were decrypted or not, an expansion button will appear on the top right. If the packet was decrypted the security keys used for decryption and the related addresses will be listed, if the packet could not be decrypted and the missing item is known, you will be provided with auto-complete text boxes to enter either the missing security key or address relationship. After providing the missing items, a Redecode button will appear. Click the button to decode the packet again, if the decryption is successful, you will be asked if the complete capture must be re-decoded or not.
Creating Quick Filters
From this view you can create filters using the values of the displayed field values on the tree nodes. Just right click on a tree node and move your mouse cursor over the Create Filter menu item. Depending on the data type of the packet field you selected, different options will appear. Select one of the options and then the filter will be created and applied. Use the filter toolbar to edit or remove you newly created filter (see Filtering Packets for details).
Comparing Packets
The Packet View can also be used to compare packets and highlight the differences between them. To do so, click on the first packet on the Traffic View. Press and hold the Ctrl key on your keyboard. Click on the packet to compare to. Right click on one of the selected packets. Select the Compare Packets menu item. The Compare Packets window will appear highlighting the differences between both packets in red (see the figure below). The fields with different values will be already expanded on the tree representation although, only OTA fields will be compared. Select the checkbox at the top of the window to also include the Frame Information (non OTA fields) in the comparison.
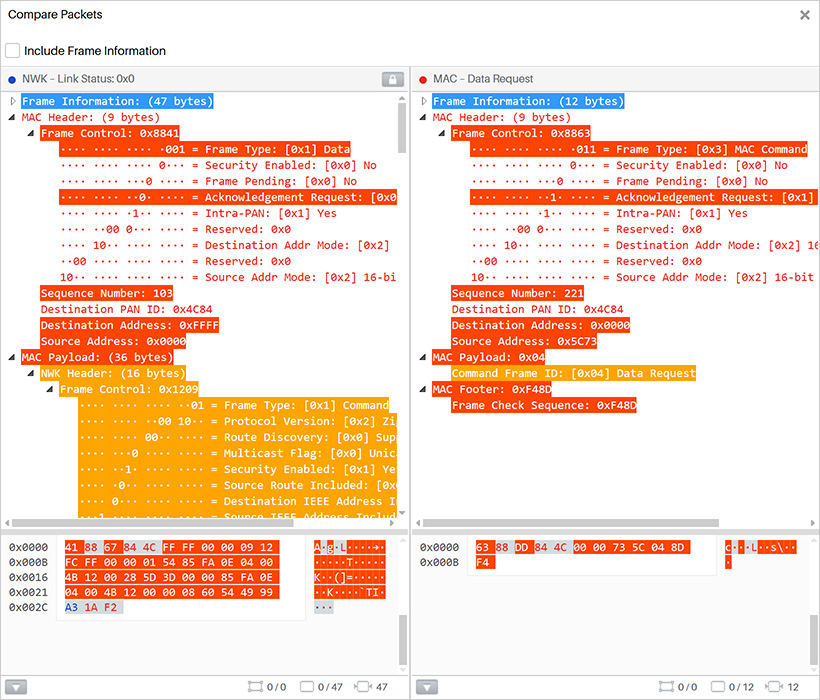
Note that is recommended to disable the Auto Scroll option before selecting the packets to be compared from the Traffic View.