Network Explorer
The Network Explorer view shows a tree representation of the network devices found on a capture log. You can customize the hierarchy of the tree grouping your devices by protocol, PAN ID, channel or vendor, besides having the option to select the properties that you would like to display, and sort the entries according to your preferences.
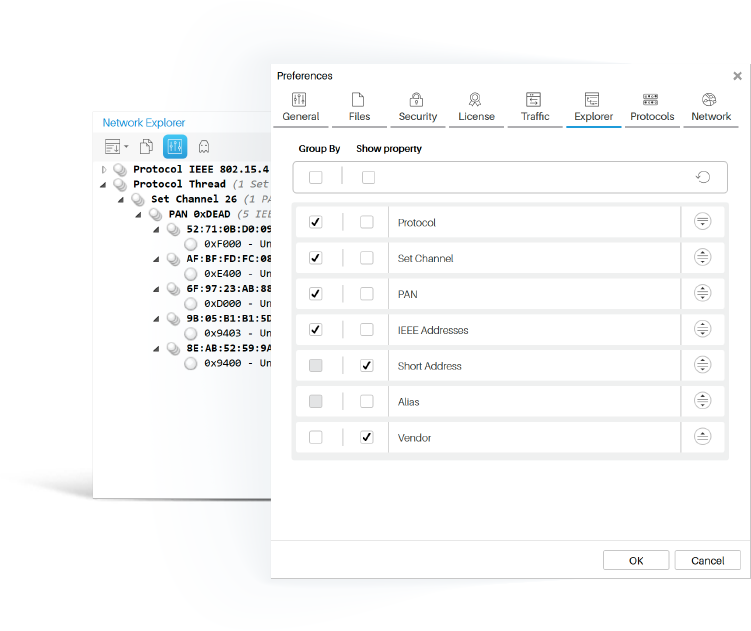
In the Network Explorer toolbar, the first button (from left to right) allows you to sort your tree nodes, in order to visualize your data in ascending or descending order. The second button copies the network list and its addresses to the clipboard, the third button opens the Preferences window, with the Explorer tab selected, to configure the Network Explorer. Another way to reach to this configuration window is by clicking the Tools > Preferences menu item, and then selecting the Explorer tab. The last button allows you to hide/show the ghost nodes, these are nodes that have not communicated for a while or that announced they were leaving the network.
Once the Explorer tab is open you will be presented with different node properties, each one of them has 2 column with check boxes. The Group By column allows you to group your devices by Protocol, Channel Id, PAN, IEEE Address, and Vendor; these mentioned properties plus Short Addresses and Vendor, are the options enabled in the Show property column, so you can check those you need to be displayed in the Network Explorer window.
If you need to change the hierarchical order of your tree view in the Network Explorer, you can also drag and drop the properties in the Explorer tab, in order to customize your information display needs.
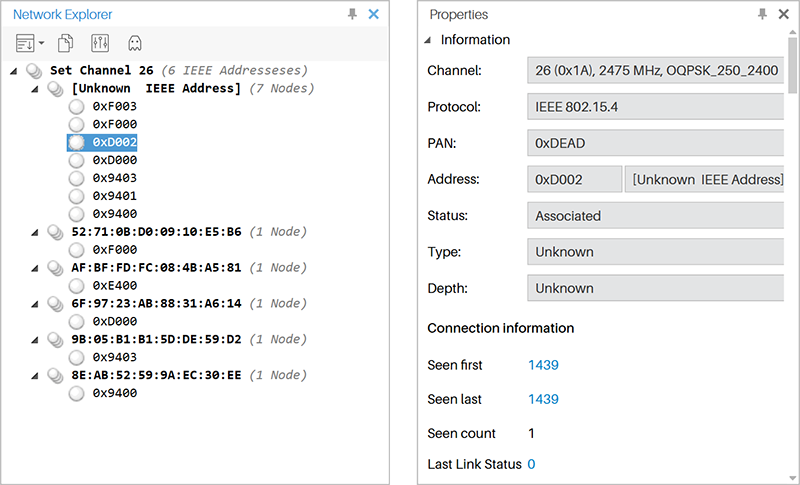
The Network Explorer is directly connected to the Graphic and Properties views. When you select a node on the Network Explorer, it will be selected on the Graphic View, and its information will be shown in the Properties View.
If you need to see the full information of a node, you have to right click on it, and select the View Properties option, after this, the Properties View window will open showing the selected node information, if this window is already open, you just have to click on the node to see its information in the Properties View.
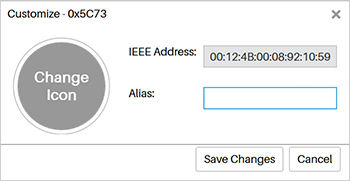
Customize, Go to packet first time seen and Go to packet updated are the other displayed options when you right click on a node. Selecting the Customize option, gives you the possibility to change this node property, a dialog window will be open with the current alias of the selected node loaded in a text input, to modify it delete the input data and enter the new alias you want to give to the selected element, to set the changes press the OK button at the bottom right of the dialog, if you want to keep the same node alias just press the Cancel button. You can change the node alias anytime you need by following the previously mentioned steps. If you want to revert the alias to its default value just clear the text, and press the OK button in the dialog window.
If you select the Go to packet first time seen option, the correspondent row of the selected packet in the Traffic View will be highlighted, an equivalent action will happen if you select the Go to packet updated option, the highlighted row will be that where the selected packet was updated.
Automatic vendor detection for network devices
The vendor name of your network devices can be seen in the tree view structure of the Network Explorer, making it easier for you to identify them in the hierarchical representation. To be able to see this property, the long address of the device must have beed identified in the current capture, and only those vendors who are registered in the IEEE list (http://standards-oui.ieee.org/oui.txt) will be recognized. The IEEE list will be loaded automatically in Ubiqua the first time you install the software.
You can update your list directly from the IEEE website http://standards-oui.ieee.org/oui.txt, or download the .txt file and keep this information stored in your computer, to both update and load this local file, click the Tools > Preferences menu item, in the General tab, navigate to the IEEE OUI (Vendors) section at the bottom of the window. To update directly from the IEEE site click the Synchronize from IEEE button, following this action an alert window will appear indicating the number of elements that have been added and updated, once you have done an online update, you can do another one within 2 hours, since this type of information is not updated constantly. To load the .txt file check the Synchronize from File check box, after this load your local file. There are two update options for you to choose, the Update option which adds the information to the existing list, and the Replace option that deletes the existing data and replaces it with the content of the document that is being loaded, once you have selected one of the options press the button Synchronize from File at the bottom right of the window to finish this task.
Short address list
Every time a node joins the network, it is assigned a short address. If the node leaves and then rejoins the network, a new short address may be assigned to it. The record of this events is saved by Ubiqua and can be found in the Network Explorer window, listed in the last level of every branch in the tree representation of this view. The list is compounded by the current short address of the node, in case the node has been assigned short addresses that are no longer valid during the capture, the node information will appear striked through in the list. Note that to be able to display the Short Address list, this option must be checked in the Network Explorer configuration window, under the Show property column.